Track Editor
The track editor is by far the most indepth part of the custom track tools, so you’ll want to get comfortable for this page as there’s a lot to cover.
The track editor is where you edit all of the data for your track. This includes tiles, sections, textures and various other data that is associated with all three. It’s important that everything is configured correctly for your track to function properly in-game. Some manual work for defining your track flow is required. If you’re experiencing issues with AI navigation and not being able to go down routes, not configuring your track first will be the reason why.
Once you have a scene setup with your TRM track, you can acess the track editor by navigating to BallisticNG -> Track Configuration -> Track Editor.
So what are tiles and sections anyway?
Before going any further it’s important to know what tiles and sections are. These are the fundemental building blocks of every track so understanding what they are and why they are first will make your life easier.
Tiles
Tiles are quads (squares) that make up a side of any part of the track. Because we’re working with a modern game engine you will see each tile as 2 triangles if you look at them with a wireframe, but for all intents and purposes the game treats them as if they were a quad.
Both the floor and walls are made of these and they are used for texturing and providing fundemental gameplay mechanics such as the track pads, pitlane recharging and spawn points.
Sections
Sections represent a point along the track, storing the tracks shape at their location and inform the game how the track flows. A section is defined by two tiles next to each other. One of the most important roles of sections is to define where junctions and pitlane entrances are, which allows Ai to see and concider taking routes and also fly into the pitlane if they’re low on energy.
Section Setup
Note
Also see the Section Tracking page for a detailed look at how the game’s section system works. If you run into any issues, this will help you out.
Before doing anything else you will want to get your sections setup. The track data generator will do a good job of doing all of the heavy lifting for you, but there will be a few corrections and additions you’ll need to make for the track to be fully functional.
In the track editor navigate to the sections tab and enter section edit mode. You will now see purple cubes and lines being drawn in the scene. These show you the tracks section data and are what you will be interacting with.
Loop Point
When there’s pitlanes and alternative routes the track will by default see that route as an extension of the main one. We don’t want this as the main route should be looping back on itself, so let’s get that setup.
Look for where you started creating your track layout, presumably the start grid, to look for a section that isn’t pointing to the next one to create a complete circuit. We’ll refer to that section as end, and the one it’s supposed to be connecting to we’ll refer to as start.
In the track editor switch to the next tab to select the next tool
Select end by clicking on it
While holding down ctrl, click on start
You should now find that end is connected to and pointing towards start.
Alternative Routes and Pitlanes
As of BallisticNG 1.3.3, you can also have nested routes!
Create The Junction
To create an alternative route or pitlane we need to define a junction reference and tell the game which sections are where the route start and ends.
Make sure you’re in the next tab and set Next Mode to Junction
Select a section that’s at the entrance to your route (section a), hold ctrl and then click on the first section in the alternative route (section b)
Set Next Mode back to Next
You should now see that that there’s a line drawn between section a and section b
If the route you are setting up is a pitlane then also make sure you reselect section a, head over to the metadata tab and tick the Is Pitlane Entrance box. This will let the AI know the route is a pitlane.
Finally you’ll want to fix the end of the route so it’s pointing back onto the closest section on the main route. You do this the same way you setup the loop point, using the next tool without Set Junction Reference enabled.
You’ll now need to define the route itself:
Route Start/End Types Setup
To finalize our route we need to setup 2 flags to tell the game where the route starts and ends. These are very important for race positioning, as the game will use these section types to recalculate section indicies that are used when figuring out how far along the track a ship is.
Head over to the type tab
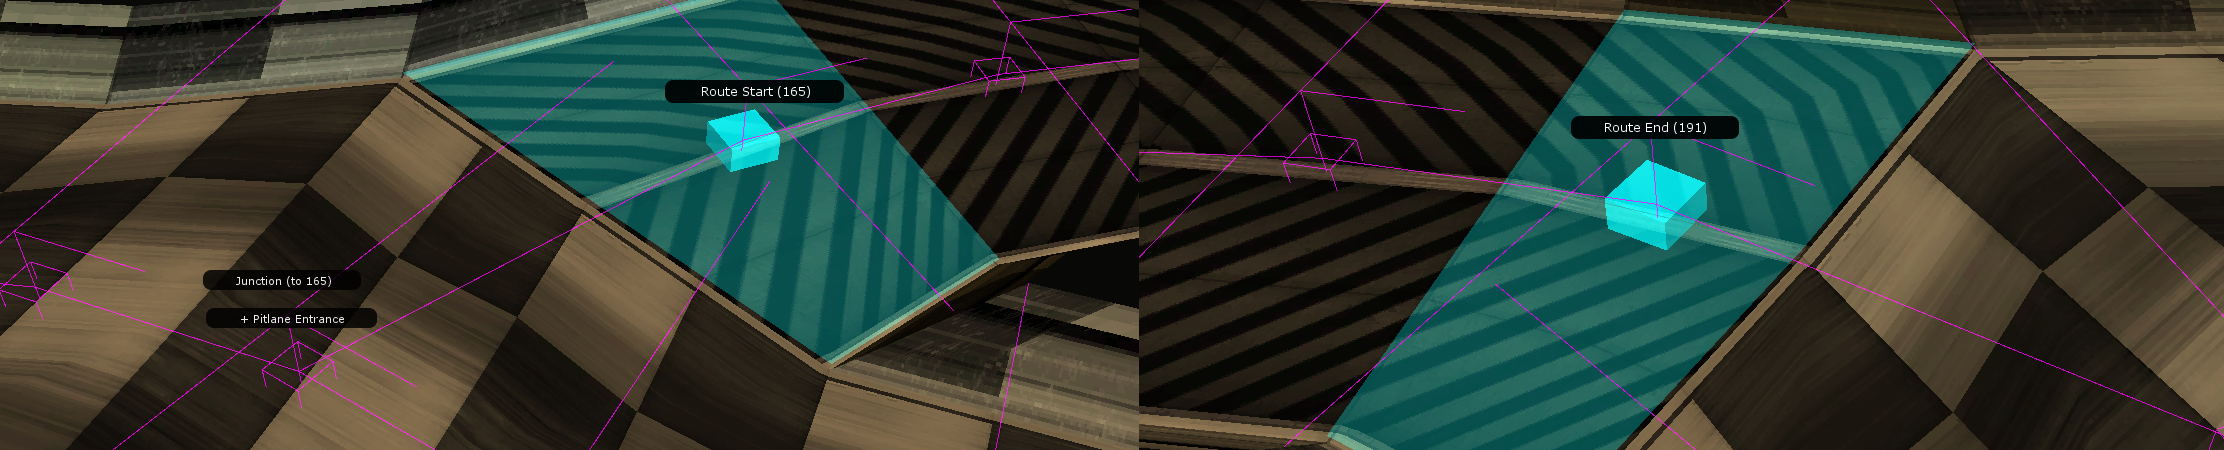
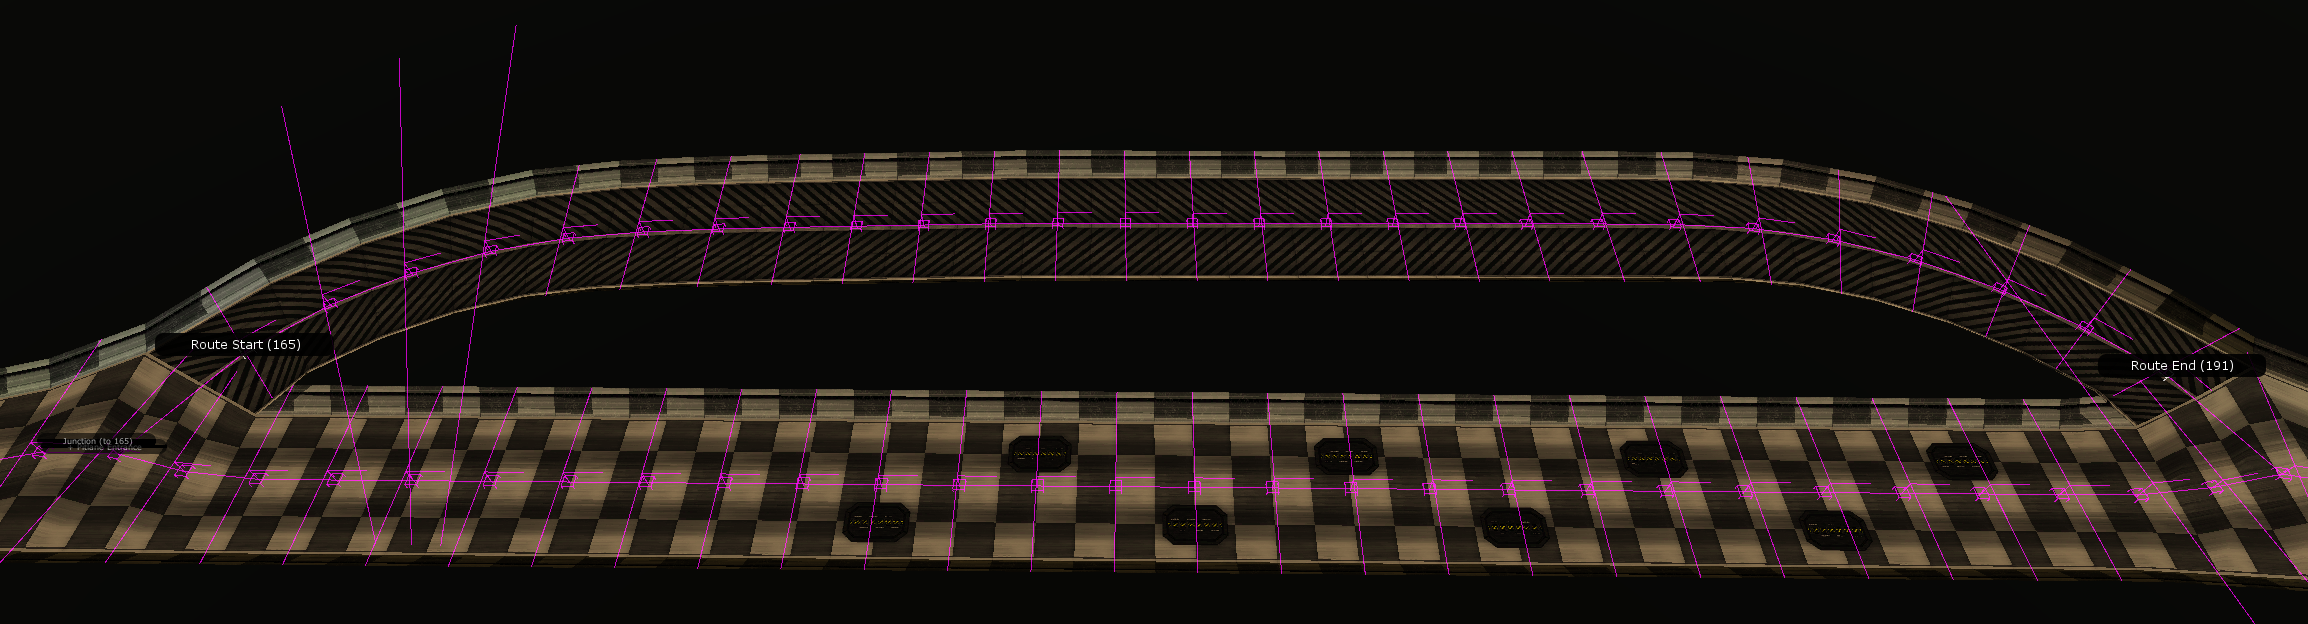
Select Route Start and click the first section in the route (what was previously refered to as section b
Select Route End and click the last section in the route
Once you’re done, your fully setup route should look like this:
Right click the images and click View Image to see these images in full resolution.
Cross-Route Junctions
It’s also possible to use junctions to connect two routes together for tracking purposes. See Section Tracking for a detailed look at how the tracking system works.
To link two routes together, simple create a junction on a section of the first route that points to a section in the second route. Don’t add a route start on the target section, this junction is not being used to define a route.
If you’d like the link to be bi-directional, you can repeat the above but in vice versa. Also note that you can have two junctions pointing at each other!
Any links that you create are valid for up to 20 sections when the ship is at the junction (5 for projectile tracking), so if you have a long stretch of track that you’d like to link together then make sure the junctions are spaced by 20 sections at a maximum.
Note
AI have a 50/50 chance of taking a junction, regardless of where it leads. For cross route links, you may want to enable the (AI) Ignore Junction setting in the metadata tab. This 50/50 chance happens on both sides of the link.
Laser Setup
To finish the section setup we finally need to define where the track lasers are. Both of them are important so we should do those now.
Head over to the metadata tab
Select a section at the end of your start grid. Make sure there is at least 2 sections between your pitlane exit and the section that you have selected (see below for details)
Click the set start line button to set the selection as a start line
Select a section somewhere in the middle of your track that the player will always pass
Click the set mid line button
And that’s it for laser setup!
Note
Image needed
Laser Placement Conciderations
The start line laser section actually takes up 2 sections. The section you set as the start line is where the start trigger is placed and the section before it is set as the indexing reference. This indexing reference is very important as it’s the anchor for the unique indentity of each section, which is why you need to make sure there’s at least 2 sections between the pitlane exit and the start line.
For the mid laser, make sure that you place it somewhere that the player will always pass through as it’s used to validate and invalidate laps. On a single route track this doesn’t really matter, but if you have splits you shouldn’t be placing it on a route a ship might not actually go down.
Full Track Editor Documentation
With the important step by step guide out of the way we can finally move onto the full documentation of the tools.
Tiles Tool
Tiles mode is where you edit settings such as the tiles behaviour and flags to trigger visual and audio behaviours. All modes in the tile tool are painter based so all you need to do is hold the left mouse button to paint the settings.
Type Mode
Allows you to paint tile behaviours.
Normal: The tile does nothing.
Boost: This tile is a speed pad. When you paint this type the tile texture will automatically update to use the assigned speed pad texture.
Weapon: This tile is a weapon pad. When you paint this type the tile texture will automatically update to use the assigned weapon pad texture.
Recharge: This tile is a pitlane recharge. When you paint this type the tile texture will automatically update to use the assigned recharge texture.
Spawn: This tile is a spawn point. When you pain this type the tile texture will automatically update to use the assigned spawn texture.
Wet Flag Mode
Allows you to paint whether the tile is wet or not. Green indicates that the flag is enabled, red indicates that it’s not.
When a tile is wet ships will kick up water off of the floor and have its engine flare reflect on the surface.
Clicking the invert button flips the state of every tile.
Shadow Flag
Note
This is redundant and not used by recent tools.
Used by the legacy lightmapper to force this tile to be baked as shadowed when baking lights. Green indicates that the flag is enabled. Red indiciates that’s it’s not.
Clicking the invert button flips the state of every tile.
Swooshable Flag
Allows you to paint whether the tile will make a swoosh noise if ships fly over it fast enough. Green indicates that the flag is enabled, red indicates that it’s not.
This flag can be used to enhance your track with swooshes to simulate objects passing the camera at a high speed.
Clicking the invert button flips the state of every tile.
Sections Tool
Sections mode is where you edit settings and linking of track sections.
Type Mode
The edit mode options allow you to change how the section operates.
Normal: The section is normal and doesn’t do anything special.
Jump: The section is a jump and will be used to flatten out the rotation so ships don’t nose dive to extreme angles as they go airbourne.
Route Start: The section marks the start of an alternative route. (very important)
Route End: The section marks the end of an alternative route. (very important)
Next Mode
Next mode enables you to edit the flow of sections along your track, allowing you to fix references that can’t automatically be set and also control the track flow for advanced track layouts.
Click to select a section. With a section selected, hold ctrl and click on another section to update the next reference of the selected section.
Next Mode: This allows you to change what setting a sections next will do.
Next: Sets the next reference, which controls the flow of the track.
Junction: Sets the junction reference, which points to the entrance of an alternative route.
Ai Next: Sets the AI next reference, which overrides the next refrence for the AI so you can control where they navigate if needed. Also see Behaviours - Override Ai Target Zone
Set Junction Reference: This tiggle allows you to toggle between setting the next and junction reference. A junction reference is a separate flow reference which links another route to the section you’re setting the reference for. If you’re creating a pitlane then also see the metadata section below.
Remove Junction: If a section with a junction reference is selected, this button will show up which allows you to remove that reference.
Metadata Mode
Metadata mode allows you to set properties on a section. There are a lot which allow you to drastically change the behaviour of ships.
Note
You can select multiple sections in this mode. Use shift while click dragging to paint add sections to the selection and use ctrl while click dragging to paint remove sections from the selection.
Utilities
Select All Sections: Selects all sections on the track
Place Object Reference: Drag an object into the object field, a place button will now show up. Click the place button to place the object at the first selected section.
Settings
Allow Out Of Bounds: If enabled then invisible walls and out of bounds checks that force the ship back onto the track will be disabled. This also disables respawn conditions so if you’re using this make sure you have respawn triggers somewhere in case the player manages to escape, otherwise they could just keep falling forever.
No Tilt Lock: If enabled then the 2159 tilt lock will not be active for this section.
No Maglock Sounds: If enabled then maglock sounds will not be used if the section is also marked as a maglock.
No Hover Point Correction: Disables correction of the hover point origin offset. This is required for track sections like half pipes, but you will need to make sure that you have a scenery floor collision extruding behind the track wall or being near the wall will have the ship think it’s falling.
(AI) Reset Fly Backwards: If enabled then ships will not be able to fly backwards further and will turn around. Used for Eliminator where the AI can combat spin.
(AI) For Teleporter: If enabled then the AI will look further along this section instead of trying to look further along the track. This allows you to ensure that AI will fly straight through teleporters and not fly into a wall trying to aim towards where it exits.
(AI) Ignore Junction: If enabled on a section with a junction reference then the AI will ignore the junction.
(AI) Always Wall Avoid: If enabled then the AI will avoid the extents of the section as if there was a wall there, even if there isn’t.
(AI) Lock Until Close: If enabled then the AI will not look ahead further until they are close to this section. Enabling this activates another option that lets you set what the distance is.
Is Pitlane Entrance: If enabled on a section with a junction reference then the AI will treat the connected route as a pitlane and will only go down it if they’re low on shield energy.
Left Tile is Maglock: If enabled then the left tile will become a maglock section.
Right Tile is Maglock: If enabled then the right tile will become a maglock section.
Rotation Multiplier: A multiplier for how fast ships will rotate to this track section.
Track Lasers
Set Start Line: Moves the tracks start line laser to the selected section. See the track laser section above for more details. Set Mid Line: Moves the tracks mid line laser to the selected section. See the track laser section above for more details.
Resets
Update Section Positions: Recalculates all section positions, useful if you want to rescale your track. This will override any manual positions so only use this if you really need to!
Reset Rotation Multipliers: Resets all section rotation multipliers to 1.
Reset Maglocks: Turns off maglock on all tiles.
Position Mode
Note
You can select multiple sections in this mode. Use shift while click dragging to paint add sections to the selection and use ctrl while click dragging to paint remove sections from the selection.
Position mode allows you to manually move sections. It’s not reccomended you do this but can be useful if you have complex tracks or wish to make scenery additions and need the track section to represent that instead of the track floor.
Position mode respects Unity’s translation space option. Use the Local/Global toggle button at the top left of the interface to toggle which space you’re moving the section along.
Use the Reset position button if you wish to resstore the selected sections to their original positions.
Atlas Tools
Atlas mode allows you to assign, paint and adjust the textures and UVs of your track.
Tiles Mode
Note
Hold down the left mouse button to paint textures. Hold ctrl and click to pick a texture from under the mouse cursor.
Tiles mode is where you select and paint your textures onto the track. In this view you also set special tile types. This assigns a texture to the various tile types and then will automatically update those tie types with the assigned texture every time you paint or change a tiles type.
Set Entire Atlas: Tick this to apply the active texture to the entire track surface upon clicking. After you have succesfully set the entire atlas this option will reset to being off. This only applies to the mesh that you click on, so for instance clicking a floor will only update the floor and not the walls.
Select Texture Grid: This is the interface where you can select an active texture. Click on the texture itself to select it. The buttons under this allow you to set special tile types.
Setting a texture to Boost will use that texture for speed pads
Setting a texture to Weapon will use that texture for weapon pads
Setting a texture to Repair will use that texture for pitlane recharge tiles
Setting a texture to Spawn will use that texture for spawn tiles
Uv Mode
Note
Hold down the left mouse button to paint uvs.
Uv mode is where you can paint the UVs (the rotation) of your textures per tile.
Paint Type |
Description |
|---|---|
None |
The UVs will be reset to their default orientation |
Vertical |
The UVs will be flipped vertical |
Horizontal |
The UVs will be flipped horizontally. |
Both |
The UVs will be flipped in both directions |
Set Entire Atlas Tick this to apply the active UVs to the entire track surface upon clicking. After you have succesfully set the entire atlas this option will reset to being off. This only applies to the mesh that you click on, so for instance clicking a floor will only update the floor and not the walls.
Textures Mode
Note
Before reading on please make sure that your tile textures are the same resolution and are marked as read/write. Floor and floor textures can be different resolutions, but the resolution must be consistent between themselves. You will want to assign any texture map slots you’re not using with a black placeholder tetxure. If you’re using 128x128 textures then you can find black placeholders in the provided tiles folder.
Textures mode is where you setup the textures to paint on your track. You can either choose them manually or use the tile database to load fully configured texture maps into the track.
Create/Delete a texture: To create a new texture click the new texture button. To remove a texture click the delete button to the right hand side of the texture entry.
Set texture maps: To set a texture map click on the texture image under the collumn that corrisponds to the map you want to set. You can also use the tile database to quickly select textures by clicking the choose from database button. See below for more information on the tile data.
Utilities
The utilities tab contains several debugging options to help update and correct any track issues.
Tile Tools
Recalculate Tile Positions: Updates the tile vertex cache and then recalculates the position of each tile from the new vertex cache.
Update TIle Vertex Cache: Updates the tile vertex cache. This is a cache of the TRM floor’s vertices. If you update the TRM you will want to use this option.
Force Refresh Tile Atlas: Forces the atlas texture to be updated and all tile references to the atlas texture to be refreshed.
Recalculate Tile Normals: Recomputes the normal of each tile. Use this if you’re updating your TRM.
Section Tools
Recalculate Dimensions: Recomputes the width and height of each track section.
Recalculate Positions: Recalculates the center position of each track section.
Recalculate Rotations: Recalculates the facing direction of each track section.
General Tools
Select Track Data Object: Selects the object containing the track data. This will give you access to some additional things such as the raw atlas texture list.
Tile Database
The tile database is a tool that allows you to quickly select pre-configured texture maps to assign to your tracks. Choosing a tile map is self explanitory so this section is dedicated to editing and adding your own database data.
About Tile Databases
A tile database is essentially a 2 layer deep folder structure that contains references to pre-configured tile texture sets for you to access. The top director is the database itself which contains categories. Categories then contain a list of tiles, which are your tile texture sets.
Accessing Tiles
To open the database editor click the green edit database button from the tile picker window. From here you will be shown the database list. If you want to create your own database then click the green add new database button. To edit a database click the database’s entry in the list.
The interface will now be split into 3 collumns. In the miiddle is the list of categories in the current selected database. To add a new category click the green add new category button. The red remove database button will remove the database that you’re currently editing.
Once you have a category selected, the right side of the interface will show you the list of tiles setup for that category. From here the add new tile button allows you to add a new tile and the remove category button will remove the category that you’re currently editing.
Editing Tiles
After you have clicked on one of the tile’s in the list it will expand to reveal three texture fields and some buttons. The auto buttons will replace the illum and reflection fields with an empty default floor or wall sized black texture. The rename button lets you change the tile’s name.
The diffuse map is the base color of your tile. These support alpha channels, just make sure you’re using a shader that supports this.
The illum map can be used to make parts of your texture glow. All of BallisticNG’s shaders use additive illumination so you want this map to define the colors of any glowing pixels.
The reflection map can be used to make reflection masks for your tiles. When using a shader that supports reflections, the color of the pixels will be used to tint the color of the reflection.
Note
When you’re done editing the database, click the save database button at the top of the window.